Nov 26, 2009

Getting the Smiles: Child Headshots and a Couple Family Portraits


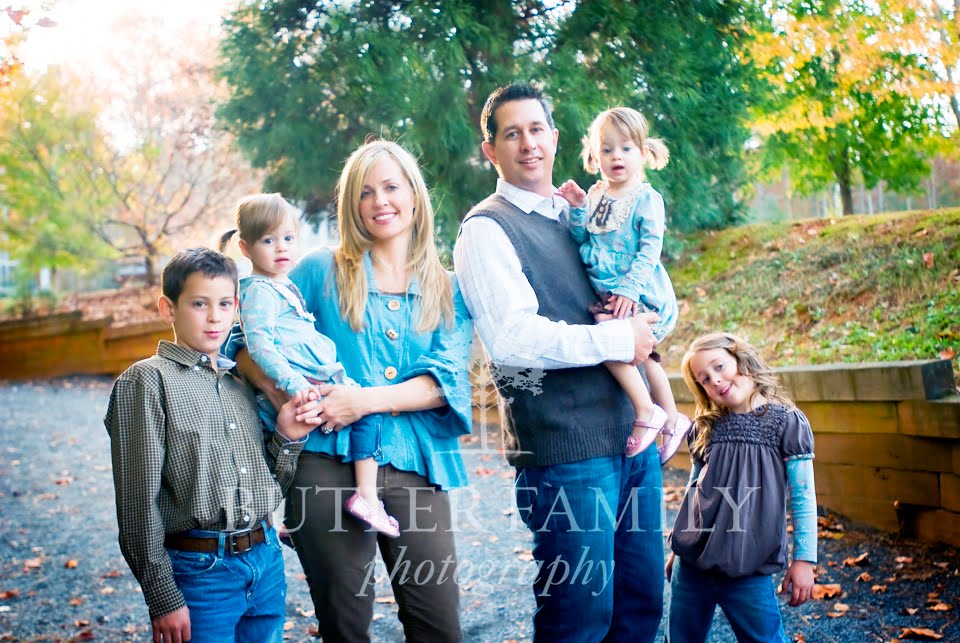
Getting a natural-looking smile in a photo isn't always the easiest task. Just ask any parent! For this shoot, my client was specifically interested in getting nice portraits of each of the kids and wasn't worried about getting a family shot (even though we snagged a couple) or other group shots. That made my job a little less complicated, so we worked on the portraits first.

I have a couple tricks when I do portraits of kids. First of all, I like to let them help out as "photographer assistants" during the shoot: holding an umbrella or monopod, helping position people in a group shot, etc. When it's their turn to have their photo taken, I let the kids pick a spot where they want their picture taken. Then, I try to interact with them in an easy-going, no-pressue manner. For younger kids, I talk to them about school and favorite hobbies. For older kids, explaining how the camera functions really helps. I often show kids the back of the camera as I am taking pictures, especially if I need them to smile or look a certain way (or in the case of the little sister here--get back into the family shot!) There is nothing like immediate feedback to help a child understand what they are supposed to do.

I often have to educate my clients how to smile for the camera in a way that doesn't look fake. The easiest way I have found is to create real situations to get a real smile. For adults, conversation seems to work the best. We naturally smile as we talk, so I shoot and gab, two of my favorite things! For kids, saying words like "spaghetti" or "macaroni" or even "okay" work really well. Those words have an "ee" sound at the end and end in a smile anyway. If the child is having a good time, smiles aren't too hard to get! Finally, have someone else behind the camera (these kids' mom was fabulous!) talking to the kid and reminding them of their friends at school, favorite people, and other smiley thoughts. Enjoy!

Nov 24, 2009

Buy One Get One Free 8x10 at Walgreens

I've recently started clipping coupons thanks to a couple friends and a workshop at church that taught me some tricks about saving money this way. So, I was thrilled when I found a coupon in this Sunday's paper for a Buy One Get One Free 8x10 at Walgreens. The coupon says if you order online, just "enter promtional code 2FOR1 for online checkout." Awesome! The code is good through Sat. 11/28/09. With Christmas coming, I'm thinking about all the photos I will want to print for presents. This is a nice way to get one of those for free.

Remember, for an 8x10 print, you will be getting a print that isn't be the same aspect ratio as the original file. Plus, labs always upsize the image so it will "bleed" (a printing term here) all the way to the edges of the paper. Here's how a photo of my photographer friend and aunt will be cropped for an 8x10 print:

Original Image


Cropped Image for 8x10 print:
Loses some of the camera at the bottom and the hat on top.

Aspect ratio is another problem with prints, but as long as you are aware of the limitations of your intended prints, you can shoot photos that have a little leeway for cropping.

Nov 23, 2009

Awesome Pair: Sibling Portrait Session


It's cool when I have a chance to work with teens (or near teens) because I love that age! After teaching junior high for 4 years, I appreciate the not-quite-a-kid but not-quite-a-grown-up mentality. It's a tough position to be in! The trick is to treat them as adults; let them know what's going on and why, and let them make decisions where they can. I was impressed by their ability to follow directions and follow my lead (especially when tromping through muddy paths up to the Roswell Mill Dam).

There's so much I love about these set of photos: their individual portraits--so gorgeous and contemplative, the back-lighting on the shots together, the lens flare on the bottom frame, and the sister's surprised smile on the brother-over-the-shoulder shot. Thanks, guys. You were awesome!

A little update:

My client sent a wonderful note about this shoot shortly after choosing photos from their online gallery: "Wow, the photos are fantastic! . . . The ringing endorsement is that [my daughter] loved the shots of her – unheard of from a 13 year old."

That made me smile big!

Nov 20, 2009

Teaching and Photography


Lately I've been combining my love of photography with my love of teaching. It's a thrill to take something I'm passionate about and share it with others in plain language that they can understand. (And photography is filled with odd vocabulary--aperture, white balance, ISO, shutter speed, exposure . . . )

Anyway, this summer, I taught a photo class to the young women at my church. Then a friend of mine told me she wished I'd offer to teach the "young at heart." In fact, she's not the only one who has expressed an interest in learning more about photography. So last night, despite the fact that I'm crazy-busy with editing and shooting lately, I held my first Photo Club meeting for other moms interested in learning how to improve their photography. We shared food, had a friendly critique of our best photos, laughed at my examples of silly mergers (sometimes I take a photo with a merger just because it's funny!), and talked shop about photos. I ate way too many Doritos and Almond Roca. Oh yes, and whoever brought the chocolate chip and oatmeal cookies, they were delicious . . . all of them. (Cookies are my Achilles' Heel!)

It's so cool to teach other people what took me years to learn on my own. And besides hosting Photo Club, I'm starting to do in-person and online mentoring with other budding photographers for a budget-friendly price. It's awesome! (And way better than laundry or dishes, which explains the state of my home right now.) So, if you are interested in working with me or learning with me, drop a me line on my contact page. I know some of you are getting new cameras for Christmas (woohoo!) and are going to need someone to teach you. That someone could be me!

Isn't this kid precious? His mom is one of my Photo Club members, and I took a series of photos of her boys in her backyard! It was so cool to find a little spot to do portraits as a surprise for her birthday.

Nov 18, 2009

Gorgeous Fall Family: Family Portrait Session (repost)


I love my clients! Especially in this case because in my first version of this post, my original images were off color. My client mentioned that the brown from one of the family photos was right, and so I reworked the color on all the other ones based on that photo. It was a pretty simple fix after I figured out the first one (a tweak to the color temperature and a bit of contrast and levels adjustment). I am so thrilled that they new versions turned out so nice, and I even had time to finish more family photos than in the original post. Yay!

So much of a photo shoot happens before and after the actual hour or so it takes to take the pictures. There's the location to pick, the research on photography styles a client wants, the poses and "unposes" to think about, the clothing to choose . . .(Yes, I do advise on clothing for just about every shoot!) Then, there's the paperwork, the phone and in-person chats, and of course lots and lots sorting, editing, and post processing. (Especially with a repost like this one.) This is custom work! But that's the thing that makes us different than a photo studio in a big box store or at the mall. And I love that. It's the reason we went into business in the first place.

Yet, even with all the planning and orchestration, every photo shoot feels like magic when it comes together and you get photos like these. For me, it happened as Jacob was editing the individual head shots of the little sisters. He took the RAW files of admittedly very cute portraits and with some meticulous work--Jacob has always been very good at that--transformed them into images even more exquisite and delicate.

And then the family portraits. There's something about a formal family portrait in the gorgeousness of the fall that I just love. The color, the setting, the moment of cooperation between all kids to look and smile for the camera, and the harmony of the color and light coming together to form something that is incredibly beautiful and peaceful and real. Thanks to this gorgeous family for the opportunity to make some amazing images with them!

Nov 5, 2009

Fall Photo Tips


Everyone loves autumn photos. And now--especially if you live in the Atlanta area--is the time to take them! It's been a very rainy fall, so picture-taking opportunities have been limited. But those bright colors will be gone before you know it! (I'm not sure they'll last much longer than a week.) Seize the opportunity, grab your camera and capture some fall photography.

Marchet's tips:

Act soon. That gorgeous red- or orange-colored tree will drop all of its leaves in a few days. Take that photo now, not just when you get around to it. During the fall, I often take my camera with me on errands, to the park, or out running for spur-of-the-moment shots.

Use fall leaves as props. But try to use leaves with some color. For some reason, kids always want to grab the ugly dead ones.

Up your shutter speed/ISO. If you want to shoot kids throwing leaves, you're going to have to go for a faster shutter speed or higher ISO to freeze the action of those leaves falling.

Get pleasing bokeh. The farther away you are from the fall foilage in the background, the more out-of-focus the background will appear. I love autumn bokeh!

Get close up on leaves. Photos of whole trees generally don't capture the color or essence of that amazing fall color. Instead, zoom in (and get closer) to a single branch (or a single leaf) and take several shots. (This same principle applies for most photography, especially portraits: get close! Fill the frame.)

Shoot in the morning or late afternoon. With daylight savings ending, I'm seeing the best light for photos around 8:00 - 9:00 in the morning and from 4:00 - 5:30 in the evening, with golden light peaking around 5:15.

If you can't shoot at those times, bring an umbrella and shoot in the sun. Just make sure your model is in shade or umbrella-shadow. That's the technique my friend and I used to shoot this little one at Lake Winward last week. (More photos from this shoot to come . . . ) Good luck!